From zero to hello (world)
TL;DR: In this post I will walk you on a path that goes from "zero" (an empty directory) to "hello world" (a working React app, using Vite as our build tool, and ESLint for code analysis), while explaining in hopefully sufficient but not excruciating detail the reason(s) behind what we do in each step.
If you want to find out why I decided to write this, the answer is in the last section.
Code
If you only want to look at or use the final code, it is in this repository: https://github.com/sole/zero-to-hello
Step by step
Prerrequisites: you'll need a working command line environment e.g. iTerm2, plus git and node.js installed beforehand, and it goes without saying, but you also need a JavaScript capable web browser (and if you don't have one, how are you reading this, with Lynx?? 😜)
Note: I commit to git at least after each step, but I will only tell you when you should totally do it, or otherwise it will get tedious!
1. Create directory structure for the project
mkdir zero-to-hello
cd zero-to-hello
And then we need the structure inside the project:
mkdir build src
What goes where:
.(root directory): configuration filesbuild: output files (what we upload to web servers)src/: application code
This is not a hard rule, but my personal preference. Some projects place the application code right in the root directory, but since all the config files are also there, I find it extremely distracting when I only want to think about application code.
If you're doing things right, you very rarely need to edit config files, whereas you do edit application code way more often!
Likewise, you could name the directories anything you want. For example, you could use source instead of src. You just would need to adjust your commands and configuration files when following the instructions in this post.
2. Create a skeletal index.html
Since we're building for the Web, we need something to show content to users: an HTML document!
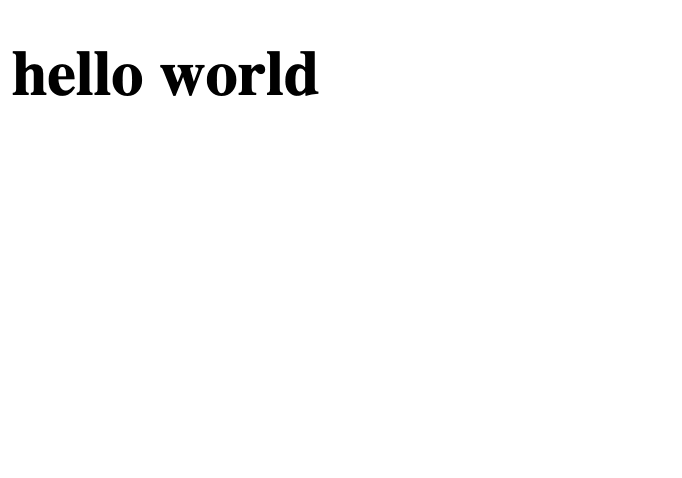
Create an empty src/index.html and make it look like this:
<!doctype html>
<html>
    <head>
        <meta charset="utf-8" />
        <title>from zero to hello</title>
    </head>
    <body>
        <div id="app">
            <h1>hello world</h1>
        </div>
    </body>
</html>
You can open this with any web browser. It should show a very simple and honest hello world message!
3. Set up git repository
We've achieved something so it's a perfect time to start committing code.
First, initialise the git repository:
git init
We also want to avoid committing some things accidentally, so create an empty .gitignore file, and add the following to it:
.DS_Store
build
node_modules
Note: .DS_Store files are a special type of hell if you're in macOS; they pop up everywhere and it's very easy to accidentally add them to a commit, so I add them to .gitignore almost by reflex now. If you're using another operating system, feel free to ignore this line, but get ready to see .DS_Store files popping up in your project if other people are running macOS and sending you pull requests.
If you run git status now it should show something like this:
On branch main

No commits yet

Untracked files:
  (use "git add <file>..." to include in what will be committed)
    .gitignore
    src/

nothing added to commit but untracked files present (use "git add" to track)
So it's an excellent moment to add what we have so far, and make our first commit!
git add .gitignore src/index.html
git commit -m 'First commit'
4. Create a package.json file for the project
We will use the file to track the dependencies we're using and specify scripts for the project, such as for building it, or for running a local server.
Run
npm init
and answer the questions it'll ask you:
This utility will walk you through creating a package.json file.
It only covers the most common items, and tries to guess sensible defaults.

See `npm help init` for definitive documentation on these fields
and exactly what they do.

Use `npm install <pkg>` afterwards to install a package and
save it as a dependency in the package.json file.

Press ^C at any time to quit.
package name: (zero-to-hello)
version: (1.0.0)
description: Demo project
entry point: (index.js) src/index.js
test command:
git repository:
keywords:
author: sole
license: (ISC) UNLICENSED
About to write to /.../zero-to-hello/package.json:

{
  "name": "zero-to-hello",
  "version": "1.0.0",
  "description": "Demo project",
  "main": "src/index.js",
  "scripts": {
    "test": "echo \"Error: no test specified\" && exit 1"
  },
  "author": "sole",
  "license": "UNLICENSED"
}


Is this OK? (yes)
After running this, you should be able to find a package.json in the root directory of the project:
{
  "name": "zero-to-hello",
  "version": "1.0.0",
  "description": "Demo project",
  "main": "src/index.js",
  "scripts": {
    "test": "echo \"Error: no test specified\" && exit 1"
  },
  "author": "sole",
  "license": "UNLICENSED"
}
We could have written it by hand, but the generated code is simple enough that it is really not worth doing it by hand. Plus, unless you're using a linter in your code editor already, it's easy to introduce errors in the JSON file which can be somehow tricky to debug.
And now that we can track dependencies, we can start adding them!
5. Set up Vite
Install npm module
First we install the Vite module:
npm install --save-dev vite
Note that we use --save-dev because we only need the module during development, not at runtime.
See how there's a new field in package.json which references the newly added module:
"devDependencies": {
    "vite": "^4.4.9"
}
Note also that a file called package-lock.json has also been created. This file is used to track the specific versions of each dependency that is used under the hood (i.e. dependencies for Vite, and dependencies for the dependencies, and so on).
That way, when you check out code from somewhere and run npm install you get exactly the same modules and versions as described, which will help you avoid really tricky to debug situations. And that's why it's so important to check in both package.json and package-lock.json into git!
Run Vite for the first time
If we were to run Vite now, we would get... a blank page! That's because it uses the current root folder as its start folder by default. You can check it out by running this:
./node_modules/.bin/vite
And a message is printed to the screen:
  VITE v4.4.9  ready in 487 ms

  ➜  Local:   http://localhost:5173/
  ➜  Network: use --host to expose
  ➜  press h to show help
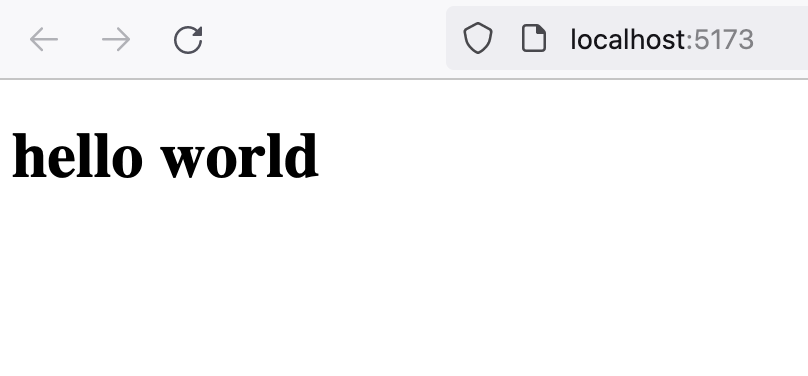
If you open that link, you'll see a blank page. Not what we want! We want Vite to use our src/index.html file instead. For that, we need to create a configuration file for Vite, and tell it where the things are.
Create vite.config.js
So create a file called vite.config.js and add the following:
export default {
    build: {
        outDir: '../build',
        emptyOutDir: true
    },
    root: './src'
}
If you had not pressed Control+C and the Vite server was still running you might get a message like this:
12:08:22 [vite] vite.config.js changed, restarting server...
12:08:22 [vite] server restarted.
Otherwise start it again (./node_modules/.bin/vite) and open the localhost location (or reload it, if it does not do that automatically). Our hello world is back, except this time it's served via the Vite server, not directly from the filesystem. Progress!
Before we move on, let's see what the settings mean:
outDirtells Vite where to place the files it builds, so we enteredbuild- the
emptyOutDirflag: makes Vite empty thebuilddirectory on each build. Otherwise, it would emit an error like:
(!) outDir .../build is not inside project root and will not be emptied.
Use --emptyOutDir to override
Finally:
root: tells Vite where the root of our project is, in the same vein as indicating the root directory of a web server, like/var/www.
Add Vite scripts to package.json
Writing the command to start the server can be a bit of a hassle, but learning and/or remembering the exact syntax it is more or less on the same league.
Let's be nice to ourselves (and whoever uses the project) and add the command to run Vite to package.json.
Open it, and add the following lines to the scripts entry, below the test script (remember to add a comma after it):
"start": "vite serve",
"build": "vite build"
This is how package.json looks like now:
{
  "name": "zero-to-hello",
  "version": "1.0.0",
  "description": "Demo project",
  "main": "src/index.js",
  "scripts": {
    "test": "echo \"Error: no test specified\" && exit 1",
    "start": "vite serve",
    "build": "vite build"
  },
  "author": "sole",
  "license": "UNLICENSED",
  "devDependencies": {
    "vite": "^4.4.9"
  }
}
Now if you run npm start this will call the vite serve command, which is equivalent to ./node_modules/.bin/vite, but is way easier to remember, and it is way more explicit for people checking out your project how to get it up and running:
In fact, npm start is actually equivalent to npm run start, but npm provides that shortcut for running the start script because you will be using it a lot!
Building the project
This brings us nicely to the build command. Stop the server if it's still running, and run:
npm run build
The output will be something like this:
> zero-to-hello@1.0.0 build
> vite build

vite v4.4.9 building for production...
✓ 1 modules transformed.
../build/index.html  0.18 kB │ gzip: 0.14 kB
✓ built in 96ms
Observe: rather than starting up a server as we did before, Vite has 'built' our project, by copying our index.html from src/ to build/. Right now they contain exactly the same content, which you can quickly check with the diff command:
diff build/index.html src/index.html
If you got nothing returned, that's exactly what we want to see at this point, because there should be no difference.
In the next step, the files that Vite serves or places in build will be substantially different from the files in src, but for now this completes the step of setting up Vite. Commit your code now!
6. Add some JavaScript
So far we've only used our skeletal HTML page to deliver content to the users, and using a build tool like Vite only for this might seem overkill. Once you start doing something that requires JavaScript and vendor code such as React or other libraries, using Vite starts to pay off.
Modern JavaScript code can be broken down into modules, which is great for developing, so you don't have to work on gigantic files, but it isn't super great for users if they have to download a lot of separate files.
A naive build tool would create a big bundle file by concatenating together all the modules in a project, and then we could ship that to users, which would address the problem of "multiple modules used".
But if you are using big libraries in your code, this approach can cause a really bloated bundle where perhaps you only use one or two functions from a library but the whole of it is included in the bundle.
Advanced build tools like Vite can identify which part of a library is actually used, and optimise away everything that isn't, thanks to using Rollup under the hood, which bundles and optimises things away.
So let's add some JavaScript to the project and let's see how Vite builds us a nicely optimised distributable build.
Create src/index.js and add this content:
alert('hello from JavaScript');
Then run Vite or start up the server. Then go to our hello world, and see how... nothing has happened. The code is neither referenced, neither executed! Vite is clever, but it cannot read our minds.
Open src/index.html so we can add the reference to our new JavaScript code. Add this after the <div...</div> and before the closing </body>:
<script type="module" src="/index.js"></script>
If you hadn't stopped the server, as soon as you save index.html you'll get the alert in your browser:
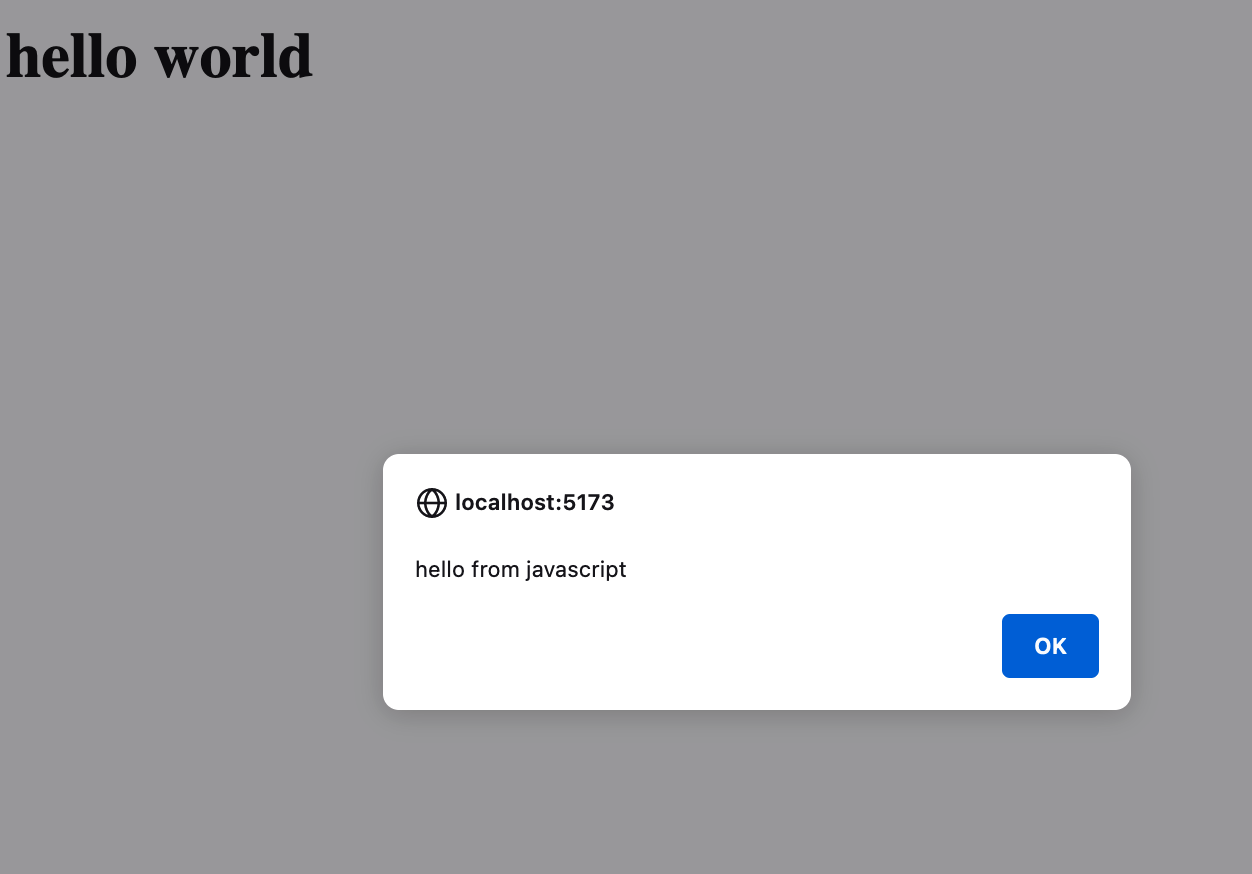
Bam! Exciting!
Also, just to test the build does build, run npm run build:
> zero-to-hello@1.0.0 build
> vite build

vite v4.4.9 building for production...
✓ 3 modules transformed.
../build/index.html                0.26 kB │ gzip: 0.19 kB
../build/assets/index-7ab5c848.js  0.74 kB │ gzip: 0.42 kB
✓ built in 182ms
Remember when I said that the output of build would be different in the next step? This is that step, and you can see how I did not lie: the contents of src and build are substantially different now:
srccontainsindex.htmlandindex.jsfiles- but
buildcontainsindex.html... and a randomly named file inbuild/assets:index-7ab5c848.js.
This is the bundler in action! Also note that the name might be different for you and even between executions in the same computer; that's why we want to clean the build directory on each run to avoid having leftovers from previous runs. (I suspect the name of the file is based on a hash of the contents of the file, but I have not double checked this).
How did we end up here?
Vue went to the entry point in index.html. Then it found a script tag pointing to a module the page was loading. It read the contents of the module, determined that the code was used, and included it in the final bundle.
Of interest, let's compare the index.html in both the src and the build directories:
diff src/index.html build/index.html
5a6
> 		<script type="module" crossorigin src="/assets/index-7ab5c848.js"></script>
11c12
< 		<script type="module" src="/index.js"></script>
---
>
The <script> tag to load index.js has been moved to the <head> element, and the value of its src attributed has been updated to point to the bundle version.
Also, build/assets/index-7ab5c848.js is not just a copy of the contents of src/index.js. If we look at it:
(function(){const t=document.createElement("link").relList;if(t&&t.supports&&t.supports("modulepreload"))return;for(const e of document.querySelectorAll('link[rel="modulepreload"]'))i(e);new MutationObserver(e=>{for(const r of e)if(r.type==="childList")for(const o of r.addedNodes)o.tagName==="LINK"&&o.rel==="modulepreload"&&i(o)}).observe(document,{childList:!0,subtree:!0});function s(e){const r={};return e.integrity&&(r.integrity=e.integrity),e.referrerPolicy&&(r.referrerPolicy=e.referrerPolicy),e.crossOrigin==="use-credentials"?r.credentials="include":e.crossOrigin==="anonymous"?r.credentials="omit":r.credentials="same-origin",r}function i(e){if(e.ep)return;e.ep=!0;const r=s(e);fetch(e.href,r)}})();alert("hello from javascript");
See how it has a little bit of bootstrapping code and then at the end there's the alert code we wrote. But it's all minified, so that we send as little data as possible to our users.
To verify this notion of discarding unused code automatically, let's add some code we do not actually use to src/index.js, so it looks like this:
alert('hello from javascript');

function useless() {
    console.log('Something that should not be exported');
}
And run the build script again. Then look at the generated build/assets/index-7ab5c848.js: it contains the same as before, and it does NOT contain the useless function, because we are not calling it in our code. Hence, Vite optimises it away.
7. Remove the alert and add more 'appy' code
So far we've been going a bit yolo and asking the browser to execute our JavaScript code as soon as it could.
This worked until now because we do not depend on anything else to be ready, but once you start building more complex applications you need to be more careful, or you might find that you get errors due to things being ready later than you thought they'd be (or worse: your users get those errors and do not understand what is happening).
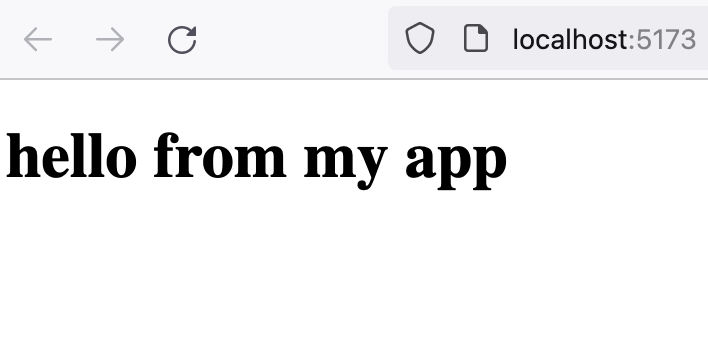
Let's make our code be a little bit more aware of timings and events. Edit src/index.js and replace the code with the following:
document.addEventListener('DOMContentLoaded', () => {
    let appElement = document.getElementById('app');
    appElement.innerHTML = '<h1>hello from my app</h1>';
});
What we're saying is: hey Browser, when the DOM is ready, run this function that replaces the contents of the element with id app with an <h1> element.
Save and test it works in your browser:
Then commit to git; this time it'll be really useful to do that, as we want to rename files and do other interesting things in the next step where we will make our code do exactly the same it's doing now, but using React instead of directly setting innerHTML.
8. Add React
Optimising code away is handy, but where build tools get really helpful is when they help you to transform code written in different languages to something browsers can understand: HTML, CSS and JavaScript.
For example, developers typically use something called JSX to write more succinct React code. In JSX files, you can write code like this:
function NiceButton() {
    return (<button>I am a Nice Button</button>)
}
But browsers cannot parse that—it is not valid JavaScript syntax, and you would get an error if you tried to put that in a JavaScript file.
Hence, developers use pre-processors to transform JSX code to something that a browser can parse, i.e. something like this:
function NiceButton() {
    return createElement(
        'button',
        {},
        'I am a Nice Button'
    );
}
And ideally this pre-processor is integrated with your build tool, so you can focus on JSX and not on having to run a utility to analyse source code files and transform things each time you do a change.
So in this step we will install the React library so we can write and use our own components in JSX, and configure Vite to help us pre-process JSX and convert it to browser-friendly code. As a bonus, we'll also rewrite the current 'app' to use React instead.
Rename index.js to index.jsx
The cue to pre-processors that a file contains JSX is normally the file extension (.jsx instead of .js).
So before using JSX or even React, we will rename our application JavaScript file with git, so we don't lose the history of the file:
git mv src/index.js src/index.jsx
Vite might print an error message:
Failed to load url /index.js (resolved id: .../index.js). Does the file exist?
Do you remember how Vite starts from an index.html entry point and then follows dependencies from there? index.html is pointing to a file that does not exist anymore.
Open src/index.html and make it point to index.jsx instead:
<script type="module" src="/index.jsx"></script>
And now Vite does not post any error.
Install React
Finally, time to install the library:
npm install --save-dev react react-dom
Why two separate packages?
reactis the so-called generic library, which can deal with virtual element trees (building a 'virtual DOM'), and changes in the elements, in a very speedy and optimised way, etc, but it is a bit 'useless' on its own, as it does not render anything.react-domallows React to interact with and render DOM elements i.e. what the browser works with and presents to users.
Splitting libraries in two like this allows developers to replace specific code like a renderer with something else (e.g. a renderer for native applications) while keeping the generic code the same.
Actually use React
To start using React, we need to bring it into our code, so add this to the top of src/index.jsx:
import { createRoot } from 'react-dom/client';
As soon as I saved the file, the Vite server printed a message:
14:14:06 [vite] ✨ new dependencies optimized: react-dom/client
14:14:06 [vite] ✨ optimized dependencies changed. reloading
And actually if you run npm run build you see Vite has a bit more of work going on now:
> zero-to-hello@1.0.0 build
> vite build

vite v4.4.9 building for production...
✓ 24 modules transformed.
../build/index.html                  0.26 kB │ gzip:  0.19 kB
../build/assets/index-56b15ca5.js  141.64 kB │ gzip: 45.65 kB
✓ built in 1.33s
Welp, our assets have inflated in size and we haven't done anything of real substance yet. We should make actual use of React to justify this increase in size!
Make src/index.jsx look like this:
import { createRoot } from 'react-dom/client';

document.addEventListener('DOMContentLoaded', () => {
    let appElement = document.getElementById('app');
    let appRoot = createRoot(appElement);

    appRoot.render(<h1>hello via React!</h1>);
    // Roughly equivalent to the above
    // appElement.innerHTML = '<h1>hello from my app</h1>';
});
Then save it. Vite will pick up the new code and reload the file. Go to the browser; we would expect to see hello via React replacing the previous content, but what we see is just... hello world, which is the static content in the HTML file, sans JavaScript.
What happened there?
If you open the browser Developer Tools you will find the answer is an Uncaught ReferenceError: React is not defined error:
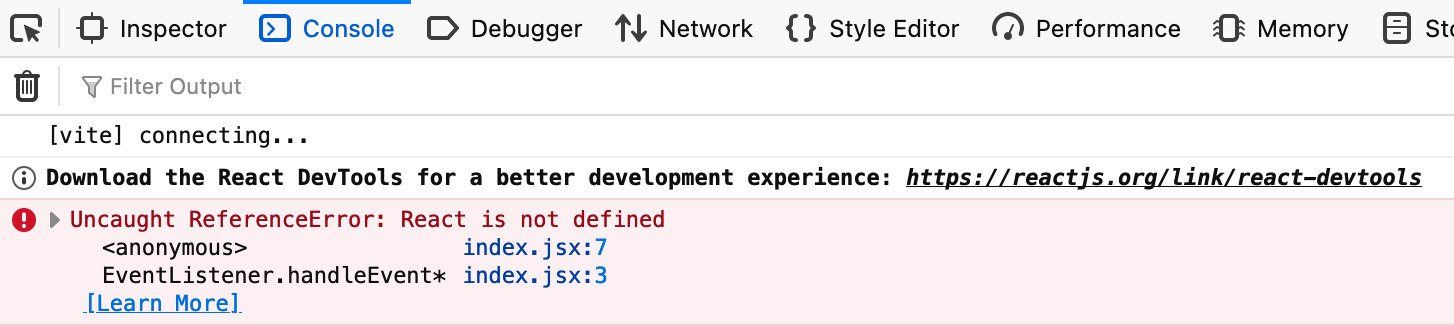
Some code seems to expect React to be defined and in this scope, but it is not. Versions of React older than 17 expected you to explicitly import it along as with createRoot, like this:
import React from 'react';
import { createRoot } from 'react-dom/client';
But newer versions of React use an improved JSX transform that takes care of making sure that React is in scope where needed. Why is this not happening?
Because we haven't told Vite how to deal with React code!
Install the React Vite plugin
So let's install the module:
npm install --save-dev @vitejs/plugin-react
And then we'll edit vite.config.js so it uses it.
Add at the beginning of the file:
import react from '@vitejs/plugin-react';
Then use the plugin by adding a new plugins entry:
plugins: [react()],
This is how vite.config.js should look like now:
import react from '@vitejs/plugin-react';

export default {
    build: {
        outDir: '../build',
        emptyOutDir: true
    },
    plugins: [react()],
    root: './src'
}
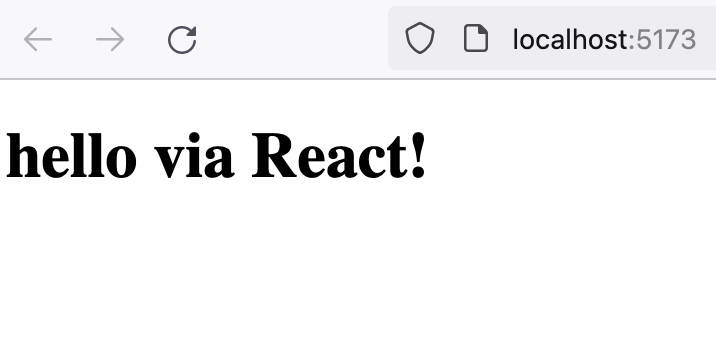
And yay! We don't have any error in the browser console, and the app is rendered via React, JSX and all:
We only have one more thing left to do before we get too excited adding code to this barebones project: we need to make sure we don't shoot ourselves in the foot.
Let's add ESLint to the project so we have someone something quietly and lovingly tell us when we mess up!
9. Add ESLint
You'll see how the process is very similar to before: install the npm module and configure things.
Install the node module
Run:
npm install --save-dev eslint
Let's try running it right now:
./node_modules/.bin/eslint .
Unsurprisingly, we got an error:
Oops! Something went wrong! :(

ESLint: 8.49.0

ESLint couldn't find a configuration file. To set up a configuration file for this project, please run:

    npm init @eslint/config

ESLint looked for configuration files in /../zero-to-hello/build/assets and its ancestors. If it found none, it then looked in your home directory.

If you think you already have a configuration file or if you need more help, please stop by the ESLint Discord server: https://eslint.org/chat
Thankfully, it is a solvable error!
Configure ESLint
Let's create a file called .eslintrc.cjs in the root directory, with the following contents:
module.exports = {
    root: true
}
This addresses two problems:
- we did not have a configuration file (we do now)
- the
rootflag also tells ESLint to not iterate our filesystem to try and find an ancestor directory that would contain a configuration file. We want ESLint to use config in this project directory only!
We run it again:
./node_modules/.bin/eslint .

/.../build/assets/index-56b15ca5.js
  1:13  error  Parsing error: The keyword 'const' is reserved

/.../vite.config.js
  1:1  error  Parsing error: The keyword 'import' is reserved
Two new problems!
The first one is that ESLint is analysing the build directory, which we don't want. Let's tell it not to, by adding this property:
ignorePatterns: ['build', '.eslintrc.cjs']
While we're on it, we're adding the very same ESLint configuration file to the ignore list. We don't need to lint it.
Another directory that we would not want to have ESLint look at is node_modules, but the ESLint docs say it is already ignored by default.
The second problem is that it does not seem to realise that we do want to use import, because we are writing modern JavaScript code with nice features such as import and export. So add this property:
env: { browser: true, es2020: true },
env is for configuring the environment(s) that our code is expected to run in, so that ESLint lets us know if we're trying to access globals, keywords and other language features that aren't meant to be there. We can specify more than one environment at once:
browser: we intend to run our code in a browser, so this ensures that acceptable browser globals will be available (for example,windowordocument).es2020: this stands for ECMAScript 2020 alias 'recent versions of JavaScript'; this means we can use modules, andimportandexportand etc.
Run ESLint again; we get a new error:
/.../vite.config.js
  1:1  error  Parsing error: 'import' and 'export' may appear only with 'sourceType: module'
OK, we needed to add this too so that ESLint's parser is properly configured:
parserOptions: { ecmaVersion: 'latest', sourceType: 'module' },
ecmaVersion: the default is5, which does not support keywords that we will use when defining modules (it describes the language pre-2015, give or take).latestat this point is sufficient for providing module support, but it can also be 'too' cutting edge. If you know what you're doing, you could set it to something specific rather than just the very last version. But for this demo, this value should be OK.sourceTypetells the ESLint parser that our code is in ECMAScript modules
So if we run ESLint again we will finally get an empty output i.e. no errors. Great!
This is the config file so far:
module.exports = {
    root: true,
    env: { browser: true, es2020: true },
    parserOptions: { ecmaVersion: 'latest', sourceType: 'module' },
    ignorePatterns: ['build', '.eslintrc.cjs']
}
Add lint command to package.json
Let's be nice again, and add a script to run ESLint using npm run. Add to the scripts entry:
"lint": "eslint ."
We can now simply run npm run lint to get ESLint to analyse our code.
Also parse JSX files with ESLint
It is quite interesting that we haven't found any more errors... perhaps because ESLint only looks at .js files by default! We need to tell it to look at both JS and JSX, so let's change the lint script to look like:
"lint": "eslint . --ext js,jsx"
If we run npm run lint
> zero-to-hello@1.0.0 lint
> eslint . --ext js,jsx

/Users/sole/data/projects/zero-to-hello/src/index.jsx
  7:17  error  Parsing error: Unexpected token <
That makes more sense! It is now analysing index.jsx but it can't because there's a parsing error (as it does not know about JSX... yet).
Fortunately, there are plugins that 'teach' ESLint how to deal with JSX, so let's install and configure them:
npm install --save-dev eslint-plugin-react
To use, edit ESLint's configuration file, and add a new extends property:
extends: [
    'plugin:react/recommended',
    'plugin:react/jsx-runtime',
]
Then run ESLint again and we get a different error:
Warning: React version not specified in eslint-plugin-react settings. See https://github.com/jsx-eslint/eslint-plugin-react#configuration .
So let's add a new entry to the config file:
settings: { react: { version: '18.2' } },
And we're back to no errors, and also we're sure that the JSX files are being linted.
Use recommended settings with ESLint
Let's reflect for a moment on what we did above: we augmented the configuration file with collections of settings that other people have written and shared, via a plugin and the usage of the extends option.
This can be really helpful to help enforce style guides (for example when working with others), or for example to make sure that you write code that uses a library the way it was intended. It's a bit like having a miniature of the original developers sitting in your shoulder and telling you that You're Not Doing It Right, before it is too late.
In the same vein, let's also use ESLint's recommended configuration. Let's add a 'eslint:recommended' entry to extends, so it looks like this now:
extends: [
    'eslint:recommended',
    'plugin:react/recommended',
    'plugin:react/jsx-runtime'
],
Another plugin that seems like it would save us from messing up is the eslint-plugin-react-hooks, as it enforces the Rules of Hooks, so install it first:
npm install --save-dev eslint-plugin-react-hooks
Then, to use it we again add an entry to extends:
'plugin:react-hooks/recommended',
This little demo project of ours does not have any code that uses Hooks yet, so it would be utterly surprising if we got any error, but it's good to run ESLint one more time, just in case we broke something in the configuration.
Finally, one last interesting plug-in that I found when inspecting the Vite create-* packages: eslint-plugin-react-refresh.
Its purpose is "to validate that components can be updated with Fast refresh", i.e. to validate that your component can be edited in a running application without losing their state. This is what Vite is using so that it can quickly update what you see on your browser when developing as soon as you edit components, so you probably want to know as soon as possible if the code you're writing is going against the grain.
Installing is similar to before:
npm install --save-dev eslint-plugin-react-refresh
but configuring it is slightly different, as we have to add a new plugins property to the config file to load the plugin:
plugins: ['react-refresh'],
and also a rules property, and a rule, because we didn't have any before:
rules: {
    'react-refresh/only-export-components': [
        'warn',
        { allowConstantExport: true },
    ],
},
Running ESLint again produces no error but that's mostly because there's no code that could break these rules yet, rather than because all of our code is correct.
If you want to be sure that JSX files would create an error, you could try triggering something that is explicitly configured in the recommended ESLint settings. For example, add this to index.jsx:
for (var i = 0; i < 10; i--) {
}
then run the linter again and bask in the glory of the errors being detected:
> zero-to-hello@1.0.0 lint
> eslint . --ext js,jsx


/.../src/index.jsx
  12:2   error  The update clause in this loop moves the variable in the wrong direction  for-direction
  12:31  error  Empty block statement                                                     no-empty

✖ 2 problems (2 errors, 0 warnings)
Success! When we do silly things, ESLint will tell us! (This code will make the tab in the browser very slow and potentially unresponsive!)
10. Bask in the glory of having set up a project from nothing AND understanding every single step you took!
Hopefully by now you have learned a lot and are feeling all smug about your accomplishments! Or at least, I am! Well done us!
👏
Background
I was consulting the documentation for various JavaScript libraries, when I noticed that many of the Getting started tutorials were pointing towards using generators such as npx create-XYZ, which generate projects from templates, rather than guiding developers on how to install and set up the library.
For example, React's Start a new project page points you to create-next-app, create-remix, or create-gatsby, etc., to set up a project that uses React. Likewise, Vite's Getting Started page suggest you scaffold your first Vite project with create-vite...
I could have done what they suggested, and just scaffold a new project with one of the generators, but I already had a project using Vite that I wanted to add React to, so this option wasn't super practical. Besides, I wanted to understand how things were pieced together, and running a generator that would simply give me the final result but didn't explain how they reached that solution or what was the rationale behind this or that configuration setting wasn't the most conducive way of gaining a good understanding of anything (at least for me).
Separately, I have (witnessed|experienced) a few situations in the last few years where a project was set up using a number of libraries such as the ones described, maybe a generator of sorts to get started, or copying code and solutions from here and there, and eventually the project always reached a point where something stopped working and no one knew why, or a certain things needs to be changed but there's such a collection of 'legacy' config and connective code that no one really knows well what each thing does, and everyone is reluctant to modify things without the fear that something, somewhere, sometime will break in mysterious and inexplicable problems.
Once you reach this point it's likely that you have to start pinning dependencies to a certain version because you cannot update without changing other things, or you end up overriding settings or installing modules that negate each other, and it's just downhill from there: your code base gets clunkier and clunkier, and the experience you deliver to your users gets wonkier and wonkier.
There are many reasons for the latter, starting with the frequent (and often breaking) changes in front-end tooling, continuing with the pressure to hide the technical debt under the carpet to ship more, faster; and perhaps finally, the high attrition in companies. As a consequence, people inherit projects that a bunch of people have 'touched' but no one truly understands, and the remaining developers don't have the time or the inclination to understand or figure out what is going on.
I can't fix the whole tech industry, but I wondered... can I set up these three libraries together (Vite, React, ESLint) successfully AND explain how the whole thing is assembled?
As you can see... the answer is yes, I can 😎, but it takes a bit of time and patience to pull things apart. However, my understanding about setting up a project like this has increased substantially, and when I want to do changes in the project I will feel way more confident than if I had just generated a project and went on to fill in the blanks with my code.
Consequently, I would encourage everyone to have a go at pulling apart projects and seeing "what's under the hood", if you can:
- It makes you read documentation that people normally don't have an immediate reason to read, and in the process you find options and settings that you were unaware that even existed!
- It also increases the chances that you learn library idioms and best practices and the why behind them, which you wouldn't get the chance to get exposed to if you only used the generated code
... and as a result, you end up writing code that is, in general, more effective and elegant. And you gain in confidence!
That being said, I still think there is a place for generators and templates.
They are a great way to get started and try things out, and library authors ensure that users start from a complete working piece of code, so they get fewer weird bug reports and avoidable questions.
Resources and further reference
- The Vite section about index.html and the Project root explains why everything starts with an
index.htmlin Viteland. - The many Vite
create*templates at https://github.com/vitejs/vite/tree/main/packages/create-vite have lots of interesting content and examples that you might want to peruse as I did to see how other people had configured their projects to do what I wanted to achieve - npm init docs real EYE OPENERS:
npm createis an alias ofnpm init- So:
npm create <package-name>===npm init <package-name>
- So:
- And
npm init <package-name>===npm exec <create-package-name> - npm exec
will download and install <package-name>and then execute its main bin - Also,
npx create-<package-name>===npm exec create-<package-name> - Thus, walking backwards from the examples:
npx create-remix===npm exec create-remix===npm init remixnpm create vite@latest===npm init vite@latest
- ... which goes a long way in explaining how does npm know what exact module to install or init!
- The npm install documentation describes the effect of a module being in
dependenciesordevDependencieswhen using the--onlyflag. - If you're curious about how to use React without JSX, the
createElementdocumentation has some examples. Side note: I have worked on projects like this, and they can become quite tedious... - ESLint documentation on configuring language options will clarify the meaning of many a config file...
- React Refresh module page for more information on the reloading feature.